
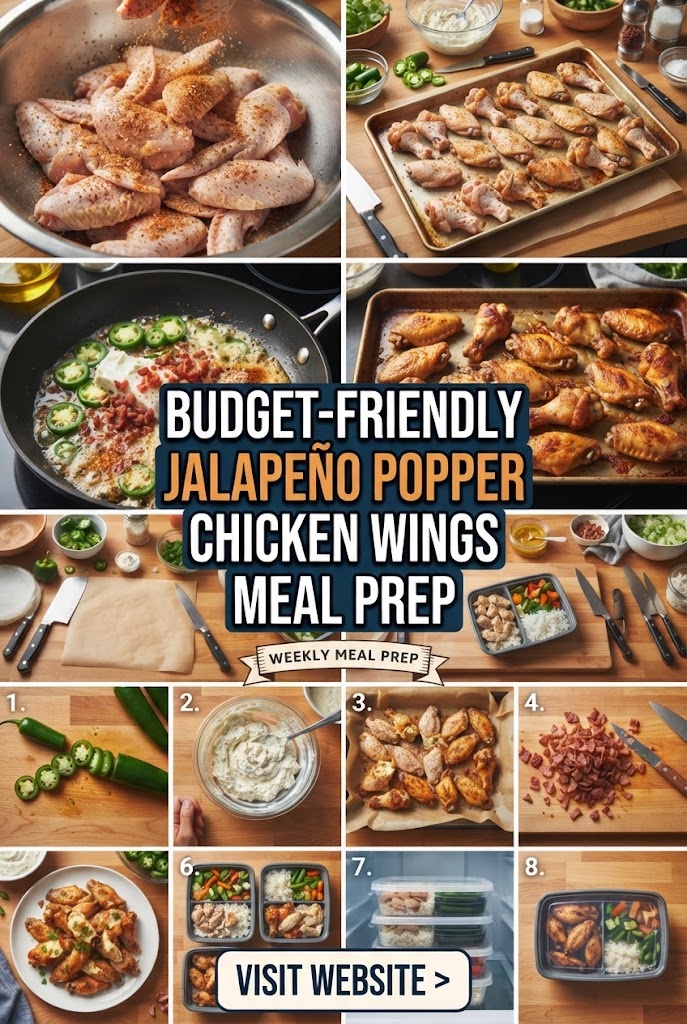
The eternal struggle of the modern meal prepper is finding a balance between flavor, health, and cost. Too often, we find ourselves rotating through the same bland chicken breasts and steamed broccoli, leading to “meal prep burnout.” But what if you could combine the indulgent, fiery flavors of a classic appetizer with the high-protein necessity of a weekday lunch?
Enter the Jalapeño Popper Chicken Wings Meal Prep.
This isn’t just a recipe; it’s a strategic approach to eating well on a budget. We are taking the creamy, cheesy, spicy goodness of a stuffed jalapeño and marrying it with the irresistible crunch of chicken wings. Best of all, by buying in bulk and using smart kitchen hacks, you can enjoy this “restaurant-style” luxury for a fraction of the price of takeout.
Why Chicken Wings are the King of Budget Meal Prep
When people think of “budget” meat, they often go straight to drumsticks or ground turkey. However, chicken wings—specifically when bought in family packs or frozen bulk bags—offer a unique advantage. They are rich in collagen and fat, meaning they stay moist even after being reheated in a microwave or air fryer.
Buying Smart: How to Save on Wings
To keep this meal prep truly budget-friendly, you must master the art of the “Whole Wing.”
- The “Split” Tax: Grocery stores charge a premium (often $1.00–$2.00 more per pound) to separate the “flats” from the “drums.” Buy the whole wings and spend five minutes with a sharp knife separating them at the joints yourself.
- Frozen vs. Fresh: Flash-frozen wings are often significantly cheaper and, because they are frozen at the peak of freshness, the quality is nearly identical to the “fresh” meat counter.
- The Baking Powder Secret: You don’t need a deep fryer to get crispy wings. A cheap pantry staple—aluminum-free baking powder—is the secret to breaking down the peptide bonds in the skin to create a shatteringly crisp texture in the oven.
The Jalapeño Popper Anatomy: Breaking Down the Flavor Profile
To turn a chicken wing into a “Jalapeño Popper” experience, we need to hit four specific flavor pillars:
- Heat: Fresh jalapeños, varying in spice depending on seed retention.
- Creaminess: A velvety cream cheese base.
- Salt & Smoke: Crispy bacon bits.
- Sharpness: Aged cheddar cheese to cut through the richness.
By deconstructing the traditional jalapeño popper and turning it into a sauce or a topping for the wings, we ensure every bite is infused with flavor without the labor-intensive process of stuffing individual peppers.
The Master Recipe: Budget Jalapeño Popper Chicken Wings
This recipe is designed for a 5-day work week. It yields approximately 4-5 servings depending on your caloric needs.
The Ingredients List (Budget Focused)
The Chicken:
- 4 lbs Chicken Wings (Split into flats and drums)
- 1 tbsp Aluminum-free Baking Powder (Essential for crunch)
- 1 tsp Kosher Salt
- 1 tsp Smoked Paprika
- 1/2 tsp Garlic Powder
The Jalapeño Popper Topping:
- 8 oz Cream Cheese (Store brand works perfectly)
- 1/2 cup Shredded Sharp Cheddar (Buy a block and shred it yourself to save money)
- 4-5 Fresh Jalapeños (Diced; keep seeds for extra heat)
- 4 slices Bacon (Cooked until extra crispy and crumbled)
- 2 tbsp Sour Cream (To thin the sauce)
- 1/4 cup Chopped Green Onions (Optional, for freshness)
Step-by-Step Preparation Guide
Phase 1: Achieving Maximum Crunch (The Oven Method)
- Dry Your Wings: This is the most important step. Pat the wings down with paper towels until they are bone dry. Moisture is the enemy of crispiness.
- The Coating: In a large bowl, toss the wings with the baking powder, salt, garlic powder, and smoked paprika. Ensure every wing is lightly dusted.
- The Bake: Place a wire rack over a large baking sheet. This allows hot air to circulate under the wings. Arrange wings in a single layer.
- Temperature Control: Start at 250°F for 20 minutes to render the fat, then crank the oven to 425°F for 30–40 minutes until they are golden brown and whistling.
Phase 2: Crafting the Jalapeño Popper “Schmear”
While the wings are crisping, prepare your topping.
- Sauté the Peppers: In a small pan, lightly sauté the diced jalapeños until they are soft and slightly charred. This mellows the raw “green” flavor and brings out the sweetness.
- The Blend: In a microwave-safe bowl (or over a double boiler), melt the cream cheese. Stir in the cheddar cheese, sour cream, and sautéed jalapeños.
- The Bacon: Fold in the bacon bits last to ensure they stay as crunchy as possible.
Phase 3: The Assembly
Once the wings are out of the oven, you have two choices:
- The Toss: Toss the hot wings in the cream cheese mixture immediately. (Best for immediate eating).
- The Meal Prep Method: Keep the cream cheese mixture in a separate small container or “dollop” it onto the side of your meal prep container. This prevents the wings from getting soggy during storage.
Meal Prep Logistics: Storage and Reheating
The biggest hurdle with chicken wing meal prep is the “Soggy Skin Syndrome.” If you microwave wings, the skin becomes rubbery. To avoid this, follow these storage and reheating protocols.
Storage Tips
- Cooling: Let the wings cool completely to room temperature before sealing the lid. Putting hot wings in a cold fridge creates steam, which ruins the texture.
- Container Choice: Use glass containers if possible. They hold heat better during reheating and don’t retain the spicy oils from the jalapeños.
- Separation: If you are using a side salad or fresh veggies (like celery/carrots), use a dual-compartment container.
Reheating for “Day 4” Quality
- The Air Fryer (Highly Recommended): 3-5 minutes at 370°F. This will restore the wings to their original glory.
- The Toaster Oven: 5-8 minutes at 400°F.
- The Microwave (The Last Resort): If you must use a microwave, heat them on a paper towel to absorb excess oil, and do it in 30-second bursts. Avoid putting the cream cheese sauce in for the full duration; add it for the last 15 seconds.
Budget Breakdown: Eating Like a King on a Peasant’s Budget
Let’s look at the estimated costs for this meal prep (based on average US grocery prices):
- 4 lbs Chicken Wings: $10.00 – $12.00 (Bulk/Sale price)
- 8 oz Cream Cheese: $1.50
- Jalapeños: $0.50
- Cheddar Block: $2.00
- Bacon (Small portion): $1.50
- Pantry Staples (Spices/Baking Powder): ~$0.50
- Total: ~$16.00 to $18.00
Cost per Meal (5 Servings): $3.20 – $3.60
Compare this to a standard order of 10 wings at a sports bar, which usually runs $15.00–$20.00 plus tip. You are saving roughly 80% by prepping these at home, with significantly higher-quality ingredients.
Nutritional Benefits: The Keto-Friendly Powerhouse
For those following a Low-Carb or Ketogenic diet, this meal prep is a dream come true.
- High Protein: Essential for muscle maintenance and satiety.
- Healthy Fats: The combination of chicken fat and dairy provides long-lasting energy without the insulin spikes associated with carb-heavy meals.
- Capsaicin: The compound in jalapeños that provides the heat is known to boost metabolism and suppress appetite.
Pro-Tip: If you want to lower the calories without losing the “Popper” feel, swap the cream cheese for Greek yogurt and use a lower-fat cheddar. You’ll gain a probiotic boost while cutting the fat content by nearly 40%.
Flavor Variations to Keep Things Interesting
Don’t want the same flavor five days in a row? Try these simple “pivots” using the same base ingredients:
1. The “Buffalo Popper”
Add 2 tablespoons of Frank’s Red Hot or your favorite buffalo sauce to the cream cheese mixture. It adds a vinegary tang that cuts through the fat perfectly.
2. The “Everything Bagel” Wing
Sprinkle “Everything Bagel” seasoning over the cream cheese topping. The dried onion and poppy seeds add a sophisticated crunch.
3. The Sweet Heat
Drizzle a tiny amount of honey or sugar-free maple syrup over the jalapeños before sautéing. The contrast between the spicy pepper and the sweet syrup is a classic culinary pairing.
Side Dish Pairings that Won’t Break the Bank
While wings are the star, a well-rounded meal prep needs sides. Here are three budget-friendly options:
- Cilantro-Lime Cabbage Slaw: Cabbage is one of the cheapest vegetables per pound. Shred it, add lime juice, cilantro, and a touch of salt. It provides a crisp, acidic crunch that cleanses the palate between spicy wings.
- Roasted Garlic Cauliflower: Buy a head of cauliflower, toss with oil and garlic, and roast it on the same tray as the wings. It soaks up some of the chicken drippings for incredible flavor.
- Classic Celery and Carrot Sticks: The traditional wing accompaniment. Buy whole carrots and celery stalks (not the pre-cut bags) to save 50% on cost.
The Science of the Perfect Wing: Why Baking Powder?
You might be wondering why we use baking powder instead of flour or cornstarch. The science is fascinating. Chicken skin is full of fat and moisture. When you add baking powder (which is alkaline), it raises the pH level of the skin. This allows the proteins to break down more efficiently and helps the skin brown more quickly (the Maillard reaction). It also creates tiny bubbles on the surface that increase the surface area, resulting in more “crunch” per square inch.
Important Note: Ensure your baking powder is aluminum-free. Standard baking powder can sometimes leave a slightly metallic aftertaste when used in high quantities for meat.
Maximizing Your Kitchen Efficiency: The 60-Minute Workflow
To make this meal prep sustainable, you shouldn’t be spending all Sunday in the kitchen. Here is a streamlined workflow:
- 0-10 Mins: Preheat oven and prep the wings (dry and season).
- 10-15 Mins: Get the wings in the oven.
- 15-30 Mins: While wings are in their first “low heat” phase, chop the jalapeños, grate the cheese, and cook the bacon.
- 30-45 Mins: Wings are now on high heat. Prepare your cream cheese mixture and your side dishes (slaw or veggies).
- 45-60 Mins: Pull wings out, let them cool, and portion them into containers. Clean the few dishes you used while the wings cool.
By the time the hour is up, you have five gourmet meals ready to go, and your kitchen is already clean.
Troubleshooting Common Issues
“My wings are stuck to the rack!”
This usually happens if the rack wasn’t greased or the wings weren’t dry enough. To prevent this, give your wire rack a quick spray of non-stick oil before placing the wings. If they are stuck, don’t rip them off; use a thin spatula to gently pry them loose.
“The cream cheese sauce is too thick.”
Cream cheese thickens significantly as it cools. If yours feels like a brick, whisk in a tablespoon of warm water, milk, or chicken broth until it reaches a “dippable” consistency.
“It’s too spicy!”
The heat of a jalapeño is concentrated in the white pith (the ribs) and the seeds. For a milder version, use a spoon to scrape out every single seed and all the white membrane before dicing. Conversely, if you want it hotter, use Serrano peppers instead.
Sustainable Prepping: Using the Whole Bird
If you followed the advice to buy whole wings, you’ll be left with the “wing tips”—those pointy little ends with no meat. Do not throw these away. Put them in a freezer bag. Once you have a dozen or so, boil them with some onion scraps and carrot ends to make a rich, gelatinous chicken bone broth. This broth can be used for soups, rice, or just sipping, effectively reducing your food waste to zero and providing even more value for your money.
Frequently Asked Questions (FAQ)
Can I make this in an Air Fryer?
Absolutely. In fact, the air fryer is superior for wings. Cook them at 360°F for 15 minutes, shaking halfway through, then increase the heat to 400°F for the final 5 minutes to get them extra crispy.
How long do these stay fresh?
When stored in an airtight container in the refrigerator, these wings will stay delicious for up to 4 to 5 days.
Can I freeze these?
Yes. You can freeze the cooked wings (without the sauce) for up to 3 months. To eat, thaw them in the fridge overnight and crisp them up in the oven or air fryer. I do not recommend freezing the cream cheese sauce, as the texture can become grainy upon thawing.
Is this recipe gluten-free?
Yes! Unlike many restaurant wings that are dredged in flour, this recipe uses baking powder and spices, making it naturally gluten-free. Just ensure your baking powder is certified GF.
Conclusion: Level Up Your Lunch Game
The Budget-Friendly Jalapeño Popper Chicken Wings Meal Prep is more than just a meal; it’s a testament to the fact that eating on a budget doesn’t have to be boring. It’s a dish that hits every sensory note—crunchy, creamy, spicy, and salty—while keeping your wallet full and your health goals on track.
By mastering the “split-your-own” wing technique, utilizing the baking powder crisping method, and strategic sauce management, you can turn a humble pound of chicken into a weekly highlight. No more sad desk salads. No more expensive, greasy takeout. Just pure, home-cooked, jalapeño-infused excellence.
Give this prep a try this Sunday, and don’t be surprised when your coworkers start asking for the recipe. Happy prepping!